Guide to working with Studio Looks
The Studio Looks by Ravengrade is an extraordinary assortment of 12 looks, developed and utilized on renowned movie and TV show productions, across multiple prestigious facilities. The Studio Looks are designed to be used in an ACES workflow to guarantee superior color fidelity and to ensure your projects are ready for the next generation of display devices and deliverables.
1. Install the looks
Copy the Studio Looks directory to the following locations, or click the “Open LUT Folder” in the project settings for quick access:
Make sure to set the 3D lookup table interpolation to “Tetrahedral” for most accurate result.
- Mac: /Library/Application Support/Blackmagic Design/DaVinci Resolve/LUT
- Windows: C:\ProgramData\Blackmagic Design\DaVinci Resolve\Support\LUT
- Linux: /home/resolve/LUT

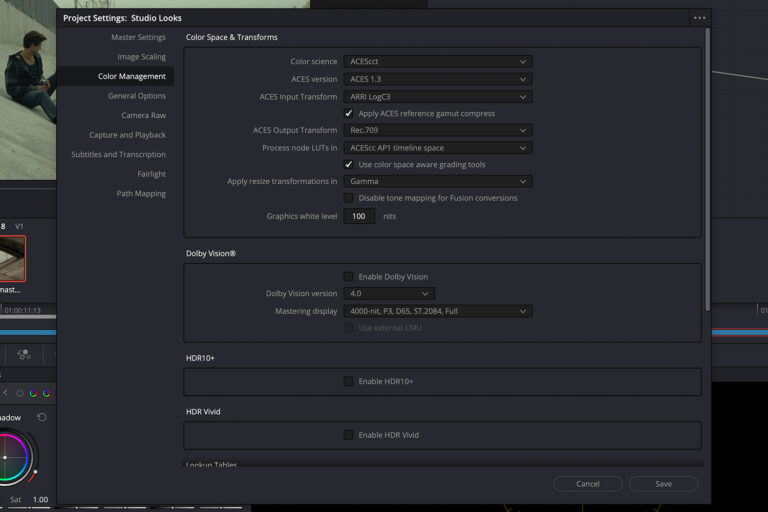
2. Color Management
Choose ACEScct and the latest ACES version.
If your footage was captured using either a single camera or multiple cameras with the same color space, choose the appropriate one from the “ACES Input Transform” menu.
If your footage was captured using various cameras, make sure to keep the “ACES Input Transform” at its default setting, which is “No Input Transform”.
Choose the appropriate “Output Device Transform” based on your display device, for example Rec.709 for standard delivery or PQ for HDR etc.
Make sure to check the “Use color space aware grading tools” checkbox to ensure that tools like the HDR wheels works properly.
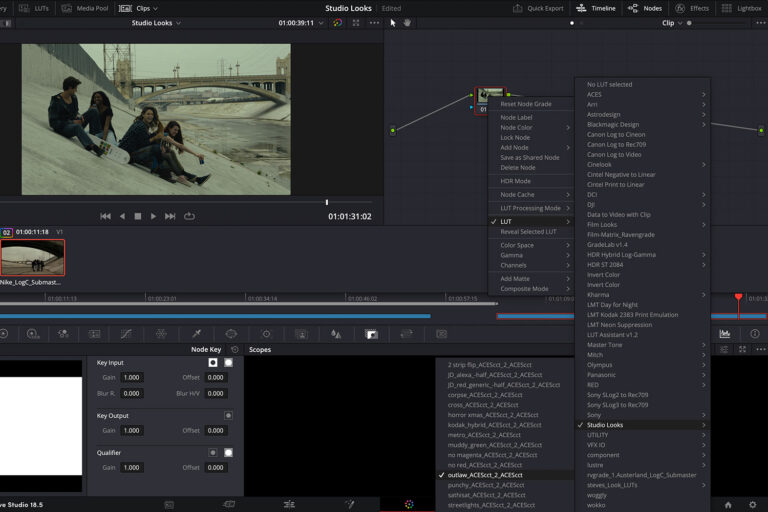
3. Apply the Look
Add a node, right click and choose your look of choice from the LUT menu.
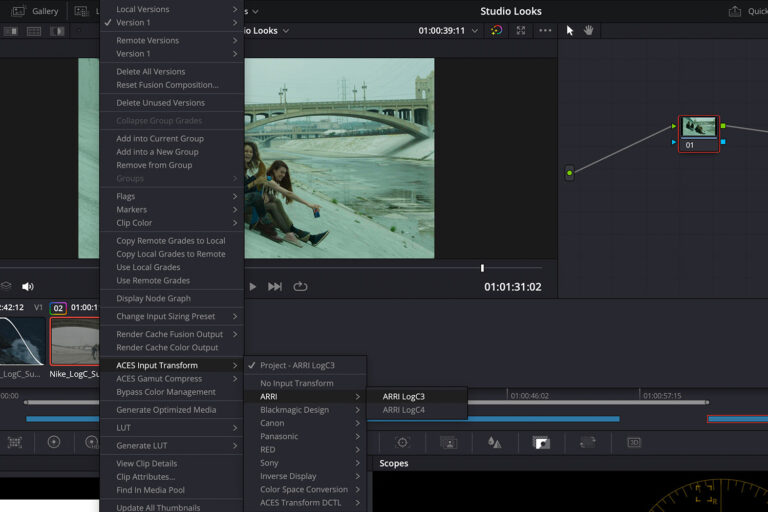
4. Assist
If you are working with footage captured using different cameras and color spaces and have selected “No Input Transform” in the color management setting during step 2, you have the option to manually choose input transforms for each clip. For instance, you can use Arri LogC3 for shots captured with Alexa Mini and RGW/Log3G10 for RED shots.
However, it’s important to note that this option won’t be available when working with RAW shots as ACES will automatically read them correctly.
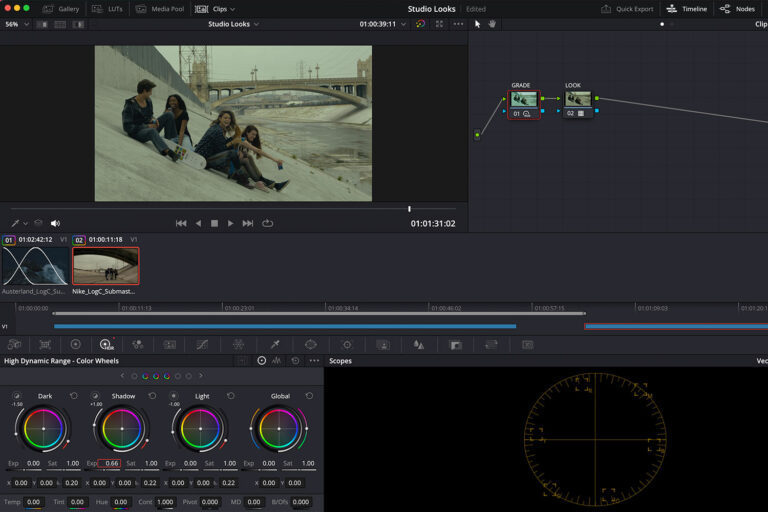
5. Grade
We recommend to add any color corrections prior to the LUT to maintain proper value ranges and prevent clipping.
Additionally, some of the functions built-in to the LUTs will work more effectively when grades are applied beforehand. This is true even though the main transform occurs at the end of the process through the ACES system.
Also, it’s advisable to use the HDR wheels for basic exposure and balancing adjustments when working with ACES in Resolve, because its color space aware palette is designed to use ACES at its full advantage.
Look overview
2 strip flip_ACEScct_2_ACEScct
This a deformation of a 2 strip cube that is rotated and yields an interesting look.
Corpse_ACEScct_2_ACEScct
Look from an animated film that had a bit of a macabre vibe.
Cross_ACEScct_2_ACEScct
This cross is between the standard processing and a skip-style contrast curve.
Horror Xmas_ACEScct_2_ACEScct
This cube hit the cutting room floor for a horror film.
Nomagenta_ACEScct_2_ACEScct
A cube with less magenta that works as a great starting point in many genres. It is also great for restoration titles with the old telecine pink that must be corrected. Throttle to taste.
JD_alexa_-half_ACEScct_2_ACEScct
This is an alternative Alexa mapping. It has a built-in half-stop down to get a bit more on the sensor. The rendering is intended to be this way, but it can also be used as a starting point for other Alexa cubes.
JD_red_generic_-half_ACEScct_2_ACEScct
This cube was first built for Ippv2, and this is the ACEScct version. It has been used on several RED shows, and has a half stop down built in.
Kodak_hybrid_ACEScct_2_ACEScct
This is a print simulations scanned at Fotokem. It has the standard kodak 5219 top end, but deviates in the shadows per the DP’s request. The recent show it was used on had a skip bleach pull 1 process, and the extra cyan in the shadows plays very well with the pulled but still high contrast skip. Try it out!
Metro_ACEScct_2_ACEScct
Used on several feature films.
Muddy_green_ACEScct_2_ACEScct
This was used on the 3rd installment of a large horror franchise.
No red_ACEScct_2_ACEScct
This is a technical LUT used on several shows and feature films. It kills red, and it’s adviced to throttle the strength of it. I was recently used for a flashback look on a show with a bunch of live grain over the top. It sort of yields the hallmark greeting card vibe. Another use case is to pair with a hue sandwich. For example, if you hue 180 degrees, apply this Cube and hue -180; then you will kill cyan instead of red.
Outlaw_ACEScct_2_ACEScct
Tame look with a bit of a yellow-lean. Straight gangsta. Used for a docu-series with many different sources all landing in ACES. A half stop down is built in.
Punchy_ACEScct_2_ACEScct
Punchy, contrasty look. Works best with a colder white point.
Sathisat_ACEScct_2_ACEScct
Naturalistic rendering except at the extremities. The hi saturated edges get more saturated. Good for commercials, beauty shots, and animation.
Streetlights_ACEScct_2_ACEScct
Streetlight heavy yellow look. Similar to what you can achieve by converting to LAB and leaning into the yellow axis.